
As is well known, there are numerous varieties of Phalaenopsis orchids. Some have bright colors, some are elegant and simple, and some are retro. Today, the editor will talk about this Piacenza Phalaenopsis orchid that those who love it really love it, while those who don't think it's ugly.
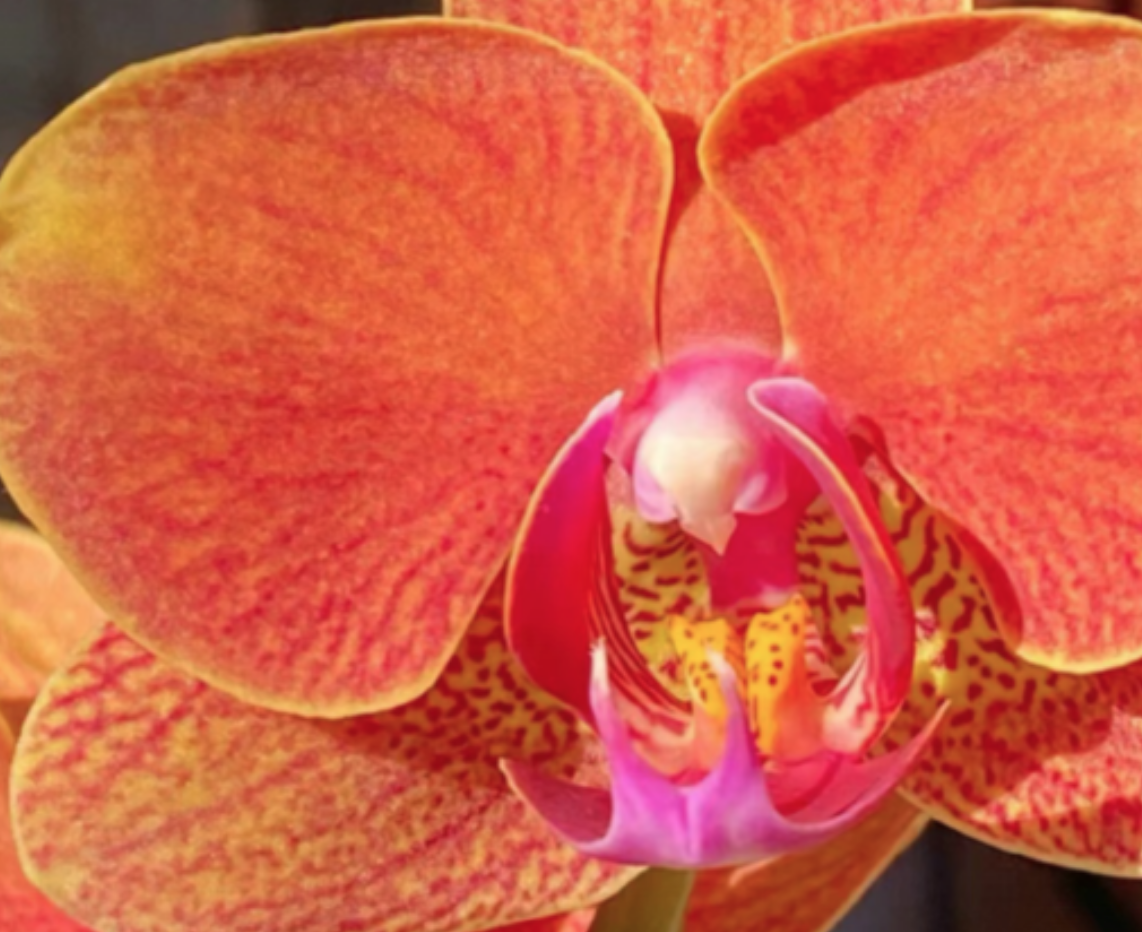
The Piacenza Phalaenopsis orchid is a European variety. After blooming, the flowers are arranged very neatly. The flower color is dull and earthy yellow, and the edges of the petals are wrinkled. When it first blooms, it is a darker ginger yellow, and later it fades a bit to become a duller yellow. It always looks dirty, and the texture of the petals is hard and waxy. The leaves are stronger than those of other varieties, so it is a relatively long-lasting Phalaenopsis orchid.
Although the Piacenza Phalaenopsis orchid is a hardy and easy-to-care-for variety, the blooming and fading of flowers are inevitable in life. So, how should it be dealt with after the flowering period? Some people simply throw it away, while some people can make it bloom again. How exactly to do it?
First, after the Phalaenopsis orchid flowers wither, you can cut off these withered flowers and leaves. It is specifically recommended to cut along one centimeter above the flower stalk. When pruning, use sharp and disinfected scissors to avoid accidentally damaging the new buds or leaves of the plant.
Then, remove all the old sphagnum moss from the flowerpot and find and cut off the rotten or hollow roots. After cutting, soak the orchid stems in diluted disinfectant water for about 3-5 minutes. This is to thoroughly disinfect the bacteria on the roots. Then place the roots in a cool place to air dry for half a day to one day.
In addition, during the air-drying time, you can prepare some new sphagnum moss. Generally, the sphagnum moss bought needs to be soaked and expanded, and then wrung dry after expansion for later use.
Finally, plant the air-dried orchid roots and sphagnum moss together. The specific operation is to first grab a large handful of sphagnum moss, form it into a sphagnum moss ball, fill the middle of the roots with the sphagnum moss ball, hold up the roots, and then continue to add sphagnum moss to wrap the outside of the roots. During this process, be sure to press the surroundings well with your hands.
After wrapping, put the roots back into the original transparent flowerpot where the Phalaenopsis orchid was planted, and then continue to add sphagnum moss until the flowerpot, sphagnum moss, and roots are closely adhered together. That's it.
It should be noted that no additional watering is required within 10 to 20 days after completing the potting. Also, do not fertilize. Place it in a place with scattered light and wait for the Phalaenopsis orchid to develop new roots. After new roots appear, normal watering can be resumed.
Is Piacenza Phalaenopsis easy to raise?
Share with
Tagged in :
Leave a Reply